

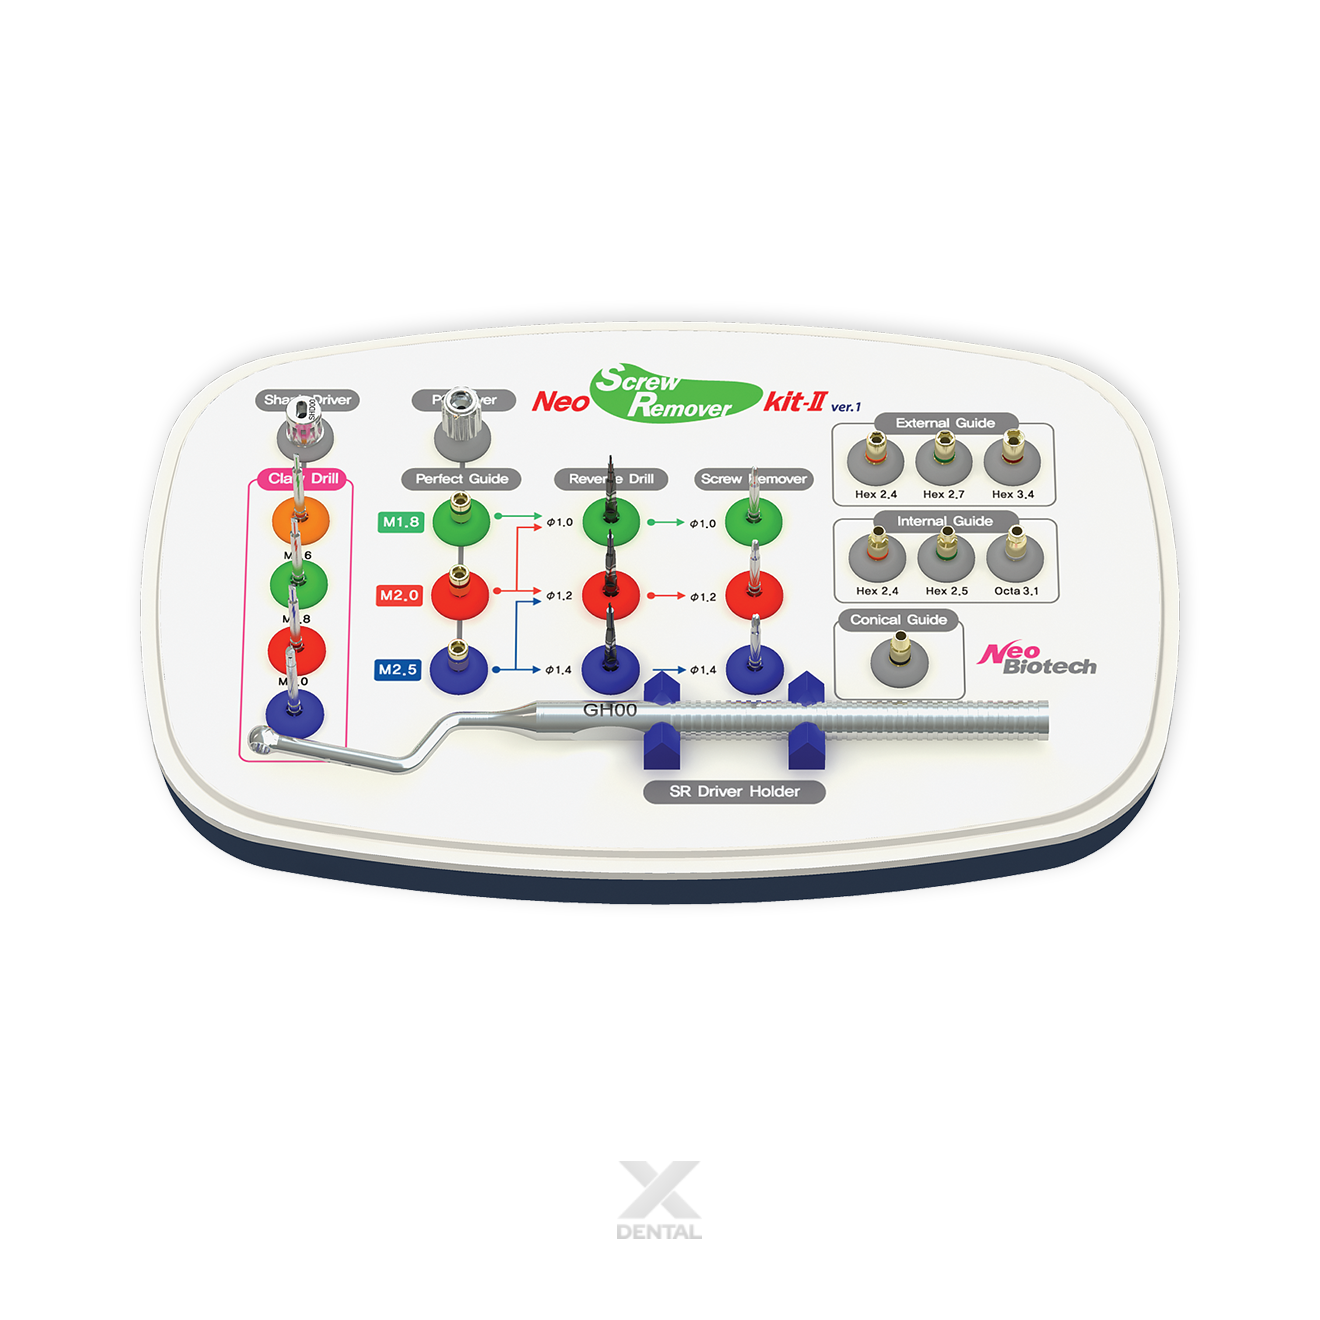

SR Kit
Screw Removal Kit
A comprehensive instrument kit for the quick and safe removal of fractured implant screws — without damaging or repositioning the fixture. The SR Kit covers the full range of fractured screw scenarios across different implant systems, with the procedure typically completed in under 3 minutes.
What clinicians are saying
Real-world feedback from implantologists using the Neobiotech SR Kit in their practices.
"A fractured abutment screw used to mean a long, anxious appointment — trying not to damage the implant while working in a confined space with limited visibility. The SR Kit changed that completely. The Perfect Guide centres everything perfectly, the reverse drill creates the purchase point you need, and the screw remover does the rest. I've done cases in under five minutes that would have taken half an hour before."
"The colour-coded system is the detail that makes this kit genuinely practical. In surgery, you don't want to be reading labels — the colour immediately tells you which Claw or Reverse Drill matches the screw size you're working with. Everything is matched and ready in the tray. It's a well-thought-out system, not just a collection of instruments."
When to use the SR Kit
Designed for the safe retrieval of fractured implant screws across a broad range of clinical scenarios — from minor abutment screw fractures to fully submerged, stuck screws in osseointegrated implants.
The SR Kit in action
See how the SR Kit removes a fractured implant screw quickly and safely — without disturbing the fixture.
Four-step removal protocol
A standardised sequence using the Perfect Guide for accurate centring, reverse drilling with copious irrigation to create a purchase point, and counter-rotation to retrieve the fractured screw.

Fractured screw

Perfect Guide seated at 15 Ncm

Reverse Drilling — 2,000 rpm with irrigation

Screw Remover — counterclockwise retrieval
SR Kit in clinical use
A case demonstrating the full SR Kit protocol for retrieving a fractured implant screw with no damage to the surrounding fixture.
Fractured Implant Screw Removal
Complete retrieval of a fractured screw using the Perfect Guide, Reverse Drill, and Screw Remover — fixture undamaged, postoperative view confirmed clean removal

Preoperative view of fractured implant screw

Ø1.2mm Perfect Guide connected to PG driver

Perfect Guide tightened at 15 Ncm

Ø1.0mm reverse drill at 2,000 rpm with irrigation

Reverse drill engaged in reverse direction

Ø1.0mm screw remover rotated counterclockwise

Fractured screw removed from screw hole

Postoperative view — fixture undamaged
What's in the kit
The SR Kit includes all instruments required for fractured screw removal — Claws, Screw Removers, Reverse Drills, Guides, and Drivers — supplied in a colour-coded dedicated tray.

Claw
Removes fractured screws by connecting to the appropriate Guide and rotating by hand in the reverse direction via the Shank Driver. M1.6 screws must be removed using the Claw only — Reverse Drill is not applicable for this size. For M1.8 and larger, the Claw may be attempted first; if unsuccessful, proceed to the Reverse Drill and Screw Remover sequence.
| Fractured Screw Size |
|---|
| M1.6 |
| M1.8 |
| M2.0 |
| M2.5 |
Screw Remover (SR)
Engages the purchase point created by the Reverse Drill and retrieves the fractured screw via counterclockwise rotation. Use at or below 80 rpm.
| Fractured Screw Size | Diameter |
|---|---|
| M1.8 | Ø1.0 |
| M2.0 | Ø1.2 |
| M2.5 | Ø1.4 |
Reverse Drill (RCD)
Creates a purchase point in the fractured screw surface. Used through the Perfect Guide at 2,000 rpm with copious irrigation. For M1.6, use the Claw instead.
| Fractured Screw Size | Diameter |
|---|---|
| M1.8 | Ø1.0 |
| M2.0 | Ø1.2 |
| M2.5 | Ø1.4 |
For M1.6 size screw, use the Claw only — the Reverse Drill is not applicable for this screw size.
Shank Driver
Accepts the Screw Remover shank for use by hand or with a ratchet — providing additional torque for stuck screws.
| Applicable | Standard |
|---|---|
| Screw Remover (SR10, SR12, SR14) | For Hand or Ratchet |
Perfect Guide (PG)
Seated into the implant screw hole to centre the Reverse Drill precisely over the fractured screw. Tightened at 15 Ncm via PG Hand Driver.
| Applicable Reverse Drill | Fractured Screw Size | Diameter |
|---|---|---|
| RCD10 | M1.8 | Ø1.0 |
| RCD10, RCD12 | M1.8, M2.0 | Ø1.2 |
| RCD12, RCD14 | M2.0, M2.5 | Ø1.4 |
PG Hand Driver
Hand driver for seating and tightening the Perfect Guide into the implant screw hole.
| Applicable | Standard |
|---|---|
| Screw Remover PG1018, PG1220, PG1425 |
2.5 Hex |
Conical Guide
For fixtures with an 11° / 8° internal connection.
| Applicable | Standard |
|---|---|
| Having 11° / 8° Internal Fixture | 11° / 8° |
Internal Guide (IHG / IOG)
For fixtures with internal hex or octagonal connections. Colour-coded by connection type.
| Applicable Fixture | Standard |
|---|---|
| Having 2.4Hex Internal Connection Fixture | 2.4 Hex |
| Having 2.5Hex Internal Connection Fixture | 2.5 Hex |
| Having 3.1Octa Internal Connection Fixture | 3.1 Octa |
External Guide (EHG)
For fixtures with external hex connections. Colour-coded by hex size.
| Applicable Fixture | Standard |
|---|---|
| Having 2.4Hex External Connection Fixture | 2.4 Hex |
| Having 2.7Hex External Connection Fixture | 2.7 Hex |
| Having 3.4Hex External Connection Fixture | 3.4 Hex |
SR Driver Holder
Angled hand instrument for accessing the Conical, Internal, and External Guides intraorally.
| Applicable | Standard |
|---|---|
| Conical Guide: CG00 | 2.4 Hex |
| Internal Guide: IHG24, IHG25, IOG31 | |
| External Guide: EHG24, EHG27, EHG34 |
Technical specifications
| Device type | Fractured implant screw removal instrument kit |
| Indication | Removal of fractured or stuck implant abutment / fixation screws without fixture damage |
| Applicable screw sizes | M1.6 · M1.8 · M2.0 · M2.5 |
| Multi-system compatibility | Capable of removing fractured screws from different implant systems |
| Reverse Drill speed | 2,000 rpm with copious irrigation (M1.8, M2.0, M2.5) |
| Screw Remover speed | At or below 80 rpm |
| Screw Remover diameters | Ø1.0 · Ø1.2 · Ø1.4 |
| Perfect Guide tightening torque | 15 Ncm |
| Connection type coverage | Internal (2.4Hex · 2.5Hex · 3.1Octa · 11°/8° Conical) · External (2.4Hex · 2.7Hex · 3.4Hex) |
| Irrigation | Copious water required during Reverse Drill step only (2,000 rpm) — not required for Claw or Screw Remover steps |
| Manufacturer | Neobiotech Co., Ltd — Seoul, Korea |
| Origin | Made in Korea |
Getting the most from your SR Kit
Practical guidance for safe, predictable fractured screw retrieval.