


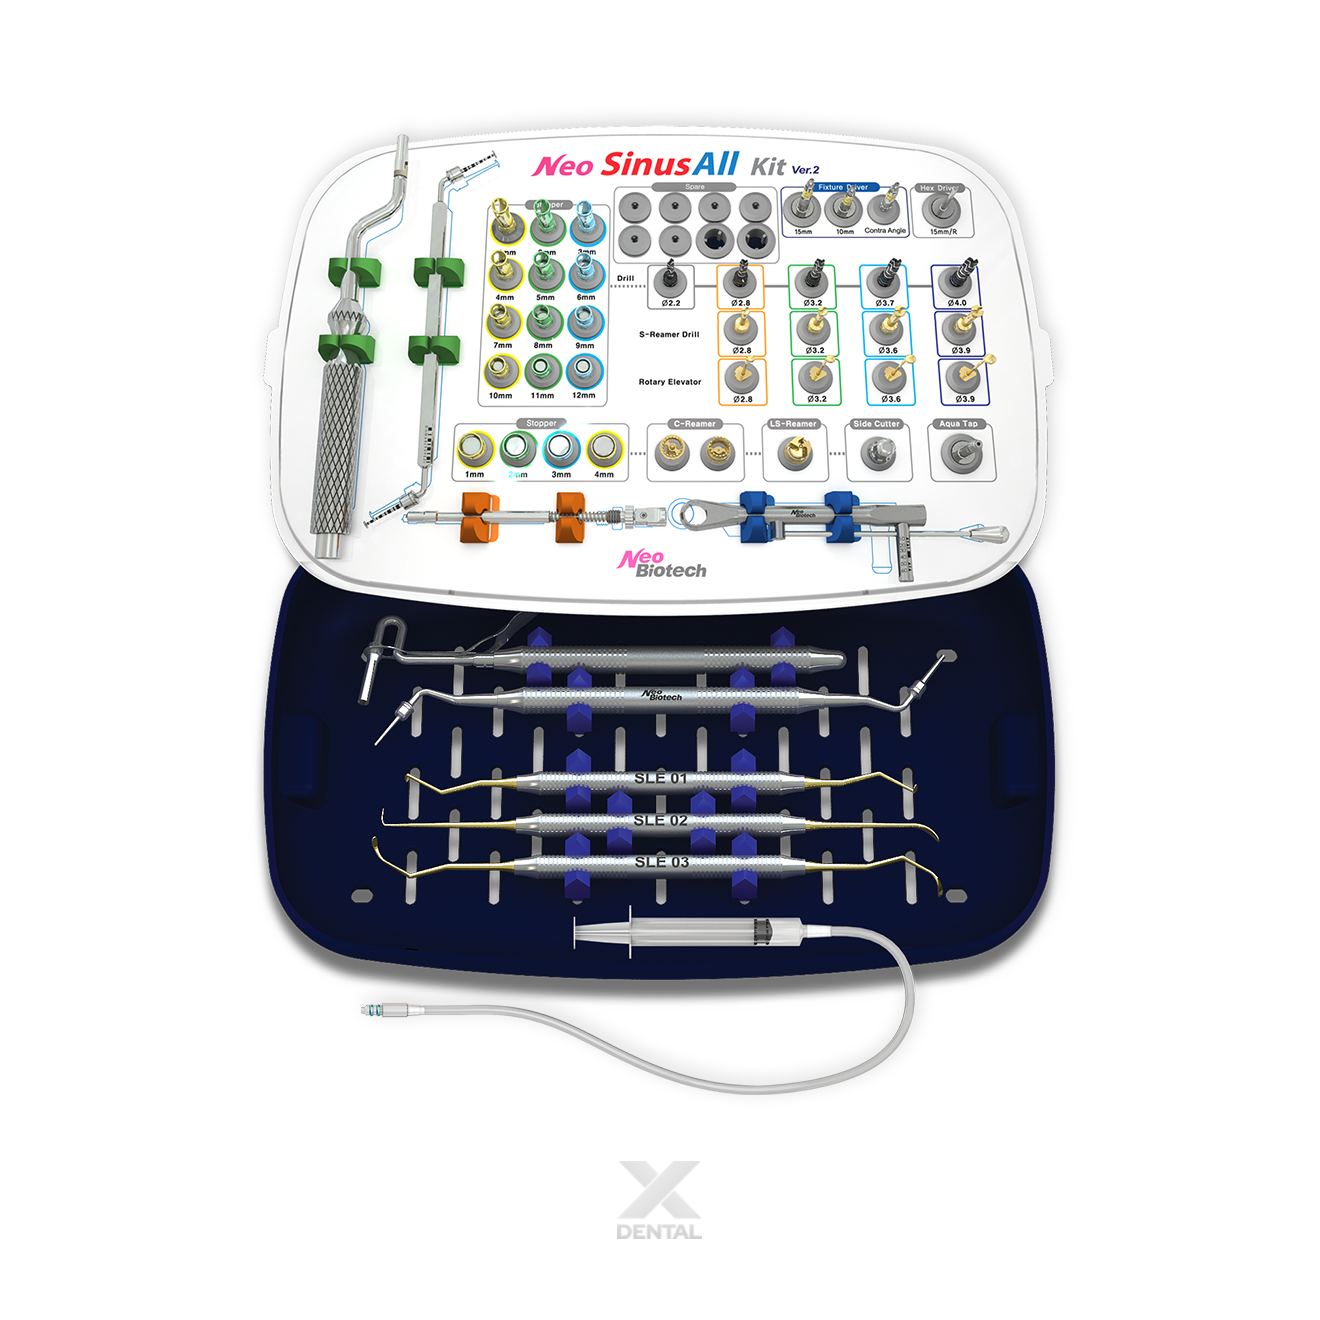

Sinus All Kit
Neo SinusAll Kit
Every approach. One kit. The Neo SinusAll Kit brings together the Sinus Crestal Approach Kit (SCA), Sinus Lateral Approach Kit (SLA), and Surgical Kit into a single, organised system. Whether the case calls for crestal or lateral access, the complete instrument set is ready in one tray — without the need to prepare and sterilise separate kits for each procedure.
What clinicians are saying
Real-world feedback from implantologists using the Sinus All Kit across crestal and lateral sinus elevation procedures.
"Having one tray that covers both crestal and lateral approaches has simplified how I plan and set up sinus cases considerably. I used to decide the approach pre-operatively and prepare two separate kits accordingly — now I can start crestal and have the lateral instruments immediately to hand if the case requires a change of plan, all from one autoclave run. The colour-coded stoppers by stage and approach mean my nurses can set up correctly the first time, every time."
"The Aqua System is what made me choose the SinusAll Kit over separating my SCA and SLA sets. Water-assisted membrane detachment through the crestal approach is genuinely different from relying entirely on bone spreaders — you can feel when the membrane lifts uniformly, and the extent is adjustable. Combined with the S-Reamer bone disk safety mechanism, it's the most controlled crestal elevation workflow I've used."
When to use the Sinus All Kit
The complete solution for posterior maxillary implant procedures requiring sinus augmentation — covering every approach in a single, organised kit.
One tray. Every approach. Maximum safety.
Three design principles that define the Neo SinusAll Kit — each addressing a real challenge in managing complex sinus augmentation case loads.

One Tray · Every Sinus Approach
One autoclave cycle covers every sinus approach
SCA, SLA, and implant placement tools are integrated into a single colour-coded tray. One autoclave run covers every approach, reducing tray preparation time, sterilisation overhead, and the risk of a missing instrument mid-procedure. Whether the case calls for crestal or lateral access, the complete instrument set is immediately to hand from first drill to final implant placement.

Designed Around Membrane Safety
Bone disk protection — in both approaches
In the crestal approach, the S-Reamer forms flat bone chips that cushion the sinus floor, making membrane perforation unlikely even on direct contact. In the lateral approach, the LS-Reamer creates a protective bone disk between the instrument and the mucosa throughout drilling. Both mechanisms are built into the instrument design — not dependent on surgical technique alone.

Colour-Coded for Clinical Confidence
Instruments grouped by stage — errors minimised
Stoppers are colour-differentiated by length — 1–12mm crestal / 1–4mm lateral — to prevent confusion at the tray. Instruments are grouped by procedural stage, so setup is fast and sequence errors are minimised. The Aqua System adds water-assisted membrane detachment via a 3cc syringe, with adjustable detachment extent — an additional layer of safety and precision for the crestal approach.
4-Week Early Loading After Maxillary Sinus Lift Using the Aqua System
A clinical case demonstrating early loading following maxillary sinus lift using the Aqua System of the SCA Kit component within the Sinus All Kit.
Both approaches — documented outcomes
Clinical cases demonstrating the Sinus All Kit across the crestal and lateral window approaches.
Clinical Case 1 — Crestal Approach (SCA)
Crestal sinus elevation using the S-Reamer and Aqua System — implant placement with panoramic X-ray follow-up

Incision

LS-Reamer

Elevate Sinus Membrane

Bone Graft

Suture

Panoramic X-Ray of Implant Placement
Clinical Case 2 — Lateral Approach (SLA)
Lateral window sinus elevation using LS-Reamer and Sinus Elevators — bone graft, simultaneous implant placement, and panoramic X-ray follow-up

#14 and #15

LS-Reamer

Sinus Elevate

Bone Graft

Implant Placement

Panoramic X-Ray of Implant Placement
Complete instrument set — three tool groups
All instruments for crestal approach, lateral approach, and implant placement are supplied in a single colour-coded tray.
Crestal Approach Tool Components
| Component | Function | Key Spec |
|---|---|---|
| S-Reamer SASR28 / SASR32 / SASR36 / SASR39 |
Perforates sinus inferior cortical wall via crestal approach; bone chips fill reamer to form flat bone disk protecting the membrane | Ø2.8 / 3.2 / 3.6 / 3.9 · 1,200 rpm |
| Stopper (Crestal) CDS010–CDS120 |
Colour-coded depth control for S-Reamer, Depth Gauge, Bone Condenser and other crestal tools. Adds 0.2mm to drill length when attached. | 1–12mm, 12 sizes (1mm steps) |
| Depth Gauge SADG01 |
Measures remaining bone thickness after S-Reamer perforation. Both tip sides are flat, designed to hook inside the sinus wall. | Ø2.6 / Ø3.1 · Do not insert more than 1mm beyond residual bone height |
| Bone Carrier JUMB02 |
Transports and inserts bone graft material into the sinus hole | 0.05cc per insertion |
| Bone Condenser SABC01 |
Keeps graft material in place on the sinus floor via the osteotomy site | Ø1.0 · Ø2.2 |
| Aqua System — Aqua Tap AQT |
Self-tapped into the crestal bone after sinus hole formation; connects the Aqua Hose for saline injection into the sinus | Attached after drilling; fixed with a ratchet driver |
| Aqua System — Aqua Hose Set AQHST (Valve, Hose, Connector) |
Water-assisted sinus membrane detachment system; 3cc syringe-based, extent of detachment adjustable by volume of saline injected | Inject physiological saline slowly and progressively |
Lateral Approach Tool Components
| Component | Function | Key Spec |
|---|---|---|
| LS-Reamer SALS640 |
Creates lateral hole in sinus wall; tapered trunk controls depth; thin bone disk forms between reamer and membrane. Sharp center point prevents slipping. | Ø6.5 · Single size · 2,000–5,000 rpm |
| C-Guide Reamer SACG610 |
Guide drill to prevent slippage and locate accurate position before C-Reamer use | Ø6.5 |
| C-Reamer SAC640 |
Creates circular bone core disk from lateral wall — disk preserved as window cover after suturing. Tapered trunk controls depth without stopper. | Ø6.5 · 2,000 rpm |
| Sinus Elevator #1 / #2 / #3 SLE01 / SLE02 / SLE03 |
#1: Initial mesial-distal membrane detachment · #2: Lower lateral wall + sinus floor, medial and posterior elevation · #3: Deep interior membrane detachment | Used in sequence: #1 → #2 → #3 |
| Side Cutter STC30 |
Widens the lateral hole formed by LS-Reamer or C-Reamer laterally | Ø3.0 · 1,200 rpm |
| Lateral Stopper CDS010–CDS040 |
Depth control for LS-Reamer, C-Reamer, Side Cutter. Adds 0.7mm to LS/C-Reamer; 1.5mm to Side Cutter when attached. | 1–4mm, 4 sizes (1mm steps) |
Implant Placement Tool Components
| Component | Function | Key Spec |
|---|---|---|
| Fixture Driver ISFD15R (Long) · ISFD05C (Contra Angle) |
Implants the fixture — long ratchet and contra-angle type for various access requirements | Long ratchet · Contra Angle |
| Hex Driver HD1215S |
Connects cover screws, healing abutments, abutment screws, and other components to the implant | Hex 1.2 · 15mm |
Note: Sinus Drill (SAD22–SAD40, Ø2.2–Ø4.0) is not included in the Sinus All Kit and must be purchased separately.
Technical specifications
| Device type | All-in-one maxillary sinus implant surgical kit — SCA + SLA + Surgical instrument set |
| Material | Medical grade stainless steel (surgical tools and drivers) |
| Catalog number | SAKIT |
| S-Reamer diameters | Ø2.8 / Ø3.2 / Ø3.6 / Ø3.9 · 1,200 rpm |
| Crestal Stopper range | 1–12mm (12 sizes, colour-coded) |
| LS-Reamer | Ø6.5 · Single size · 2,000–5,000 rpm · with copious irrigation |
| C-Reamer / C-Guide | Ø6.5 · 2,000 rpm |
| Lateral Stopper range | 1–4mm (4 sizes) |
| Side Cutter | Ø3.0 · 1,200 rpm |
| Aqua System | Aqua Tap (AQT) + Aqua Hose Set (AQHST) — 3cc syringe-based water-assisted membrane detachment |
| Sinus Drill (sold separately) | Ø2.2 / 2.8 / 3.2 / 3.7 / 4.0 (SAD22–SAD40) · 1,200 rpm · not included in kit |
| Sterilisation | Steam autoclave — Pre-vacuum: 132°C / 2 bar / 3 min / 30 min dry · Gravity: 121°C / 1 bar / 40 min / 30 min dry |
| Sterility | Non-sterile medical device — must be sterilised before and after each procedure |
| Manufacturer | Neobiotech Co., Ltd — Seoul, Korea |
| Origin | Made in Korea |
Getting the most from the Sinus All Kit
Practical guidance for efficient use of the SCA, SLA, and Surgical components within the single-tray system.